
Friday, December 21, 2012
Wednesday, December 19, 2012
The Rule of Thirds Continued
I was delighted to see this as another lesson continued because I thought I was a natural at this. But it was a little harder than I thought this time. As I was taking these pictures I had the rule of thirds in mind and what I wanted to convey. In some of the pics, the background was important so I wanted to be sure to include it and compose it just right but also use the rule of thirds. The 3rd pic down of the little girl is one I struggled with. I could've cropped her closer and put her eye right in the upper right corner but I also wanted to show her the shirt she had on and where she was in order to promote the Annual Turkey Trot we hold every year. I knew this pic would make to the newsletter so I wanted the reader to be able to see where she was and what she was doing. I really like the tip to keep the eyes as the focal point so that what I was trying to master with the Santa pics and the Turkey Trot pics. The two pics at the bottom are images that I had this in mind when I shot them so I included them in this lesson.


Friday, November 16, 2012
The rule of thirds is one of favorite photo techniques. I almost never take a centered shot. I think objects look more interesting when there is a little bit of an off angle with some background behind it. I especially like to get a shallow depth of field and close up, it's kind of my thing. I like enjoy viewing images that highlight the subject and bring the eye to the main point. I mostly shoot level with the subject and get as close as I can so my lens will do a 4 in aperature mode. I normally configure the image myself but after reading this lesson, I figured out how to view the grid in my viewfinder. Now I know to place the subject where the lines cross and set up points to compose a shot. I also like showing some of the background when it is important to show where or what the subject is doing.

This little girl was playing peek a boo with me and hiding behind her car. I wanted to get her peeking through the car and seemed to time it just right with her big smile. This image is not right on a point but I could "cheat" and crop it to do so.

This was a lucky shot! This little girl was happened to be walking by with her candy bag and her eye is directly in the point. She was close enough that I was able to set my aperature at 4.

I strategically placed my sons action figure this way to give him an empowered strong look. I played with this one a bit and took shots with him more toward the right but decided on the left because it gives the appearance that he is leading an army or force.

I could've angled this flower better if I stood above it but didn't see that when I was taking the picture. I wanted to give to affect of the flower to the lower right like it was blooming.

The men are the main focus of this pic but I also wanted to included their traditional Seneca instruments as they were singing. I was a little disappointed that I didn't get them with their mouths opening and looking like they were singing.

This little guy wouldn't quit with his power ranger moves, I moved a tad so I could get his arm at an angle rather than straight at me. His fist is almost centered but his eyes are on point.

I took this of my niece about a month ago. This might be breaking the rule of thirds but I love that she's leading into the picture. I could crop to look so it fits in one of the points but I just love it the way it is.

I knew exactly what I wanted when I taking this and the mother and son were so cooperative. I had to place her perfectly in the sun where there was no shade and bend down to put her to the right. I was also able to get close enough to have low aperature. This is one of my favorite pictures I think I've ever taken. The mother was so happy with it.

I don't know why but it just felt natural to keep placing them to the right of the shot.

I tried to work the camera the same way I did with the power ranger shot but I came a little out of focus. Sometimes I have to accept what I can get out of two and three year olds but they are so much fun!
Tuesday, October 23, 2012
White balance is a tool that helps display accurate light and colors in a digital image. It is a rather easy adjustment to make if you have the time. White balance helps the photographer get the most accurate lighting in a scene (how the human eye sees it). Below are two subject which I chose to shoot in my office. The dollhouse was inside with sunlight behind me and bulb lighting from above. The last picture of the dollhouse seems to match the real life color of the house and the room which is on the fluorescent setting. The red shoe tape dispenser was faced towards the window with the sun behind it. This one was a bit tougher to tell the true color but I think the third one down is the correct color and setting. The direct sunlight setting was used for this one. At home or on my own time I have the patience and time to set up a shot and do a white balance check. At work and on the go, it can be hard and I use the automatic white balance for the majority of these shots. If the color is not what I want to expected or off I usually correct it in Photoshop with the curve tool.

Incandescent

Direct sunlight

Flash

Cloudy

Shade

Fluorescent

Incandescent

Fluorescent

Direct Sunlight

Flash

Cloudy

Shade
Tuesday, October 9, 2012
Until this lesson, I have never
fully understood the ISO function. I was
always under the assumption that shutter speeds and ISO measurements were
somehow related or that they were the same thing. Although I have taken photography, I didn’t
know how to fully function my Nikon D90.
In the manual, it says to use the back dial in shutter mode to alter,
which I was and just assumed that it was working. It wasn’t until our last assignment that I
figured out that my shutter button is only manual when my camera is in LV
mode. This opened up a whole new and
more understandable world to me! Now
that I have figured out how to differentiate between the two, I am on my way to
being able to truly manipulate and achieve the effects I want in due time. After reading the book about ISO settings, it stated the lower the ISO, the brighter the picture. I tried to start at the high ISO and work my
way down but I didn’t really have the option when trying to capture two year
olds playing in the leaves. Instead of
going down the latter with every setting like my previous assignments, I shot
from the hip and changed the settings when I had a second. I think ISO 200 was the best lighting with
the most clear pictures but to experiment for the assignment I altered it for
every picture to see a change and get the idea of how to function my camera
properly.

This ISO was set at 3200 and the goal was to scale down and take a picture until I got to the lowest setting. I put my camera in P mode and adjusted the camera as fast as I could. Although this is a high setting, the lighting was good that day.

This image was set at 200 because I wanted to see if there was a difference in the lighting from the last setting of 3200. I can't really see the difference in the lighting of the two but I kept experimenting until I did.

I tried to hurry and scale my ISO back down to get a good shot. I also wanted alter the shutter to get the leaves falling and the aperture to make the little girl stand out of the background more.

This is set at 500 and the aperture at 5. Although it was bit higher than 200, it still had a clear shot. I believe my shots are bright because the sun was directly to the side and behind me.

I went back to ISO 200 for this one and it came out brighter and more vivid.

I left the setting at 200 because I was getting such good shots and the kids were loving the nice weather and throwing leaves. I never have time to set up shots and sometimes I think this is my downfall because I'm experienced to think fast enough.

I wasn't seeing a huge difference in my shots so I spiked this setting up to 1000 and faced a different direction. This gave me a darker front subject and light background.

This teacher was having so much fun that I kept shooting her until she was done. This one is a tad lighter but still darker than to 200 and 500 settings.

Again, this shot is dark due to the high ISO 1600. I did brighten in Photoshop a little bit, it was darker and definitley not a clear or bright shot.
Monday, October 1, 2012
1

2

3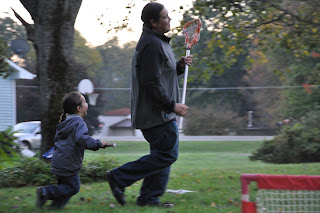

4

5

6

7

8

9

10

11

I was so worried about getting my narrative in on time that I forgot to upload the pictures to accompany it. The photos labeled 2,3,4 are my favorites because I meant to reach that effect. My goal was to keep Hiram in focus while trying to show he was moving at the same time. The photo #11 is one of my favorites as well but I got lucky on that one. I need to invest in a tripod ASAP!
Subscribe to:
Posts (Atom)